
A blog post is an article or guide published in the blog section of a website. Writing blog posts can help you boost brand awareness, credibility, conversions, and revenue because it allows you and your brand to publish insights and thoughts on any topic on your website. Therefore, learning to write a blog post is an investment in your career. There are different blog posts, but a good blog has specific characteristics regardless of its subject matter. They include a good topic, a catchy headline, a hook, and finally, a solution. This format is made more accessible by using our blog post template, as you’ll see later in the article.
Blogging is full-time and requires patience, creativity, dedication, and commitment. Therefore, many bloggers sometimes experience difficulties like writer’s block and lack quality content. But don’t worry, this blog post template article will help you get back on track.
Creating a blog post might seem easy, but it’s impossible to do so when your mind is chaotic. That’s where a blog post template comes in handy. Expert copywriters and marketers create them to guide different posts. Some of their benefits include;
- Providing a ready algorithm for writing a post
- Saving time searching for inspirations and content
- Creating relevant, attention-grabbing content for the target audience,
Blog Post Templates You Can Use
Just as there are different blog posts, there are various blog post templates. These templates allow you to take a prepared product and apply it to your case. Moreover, they are suitable for both personal and business blogs. In this article, we discuss five different blog post templates as they are shown below,
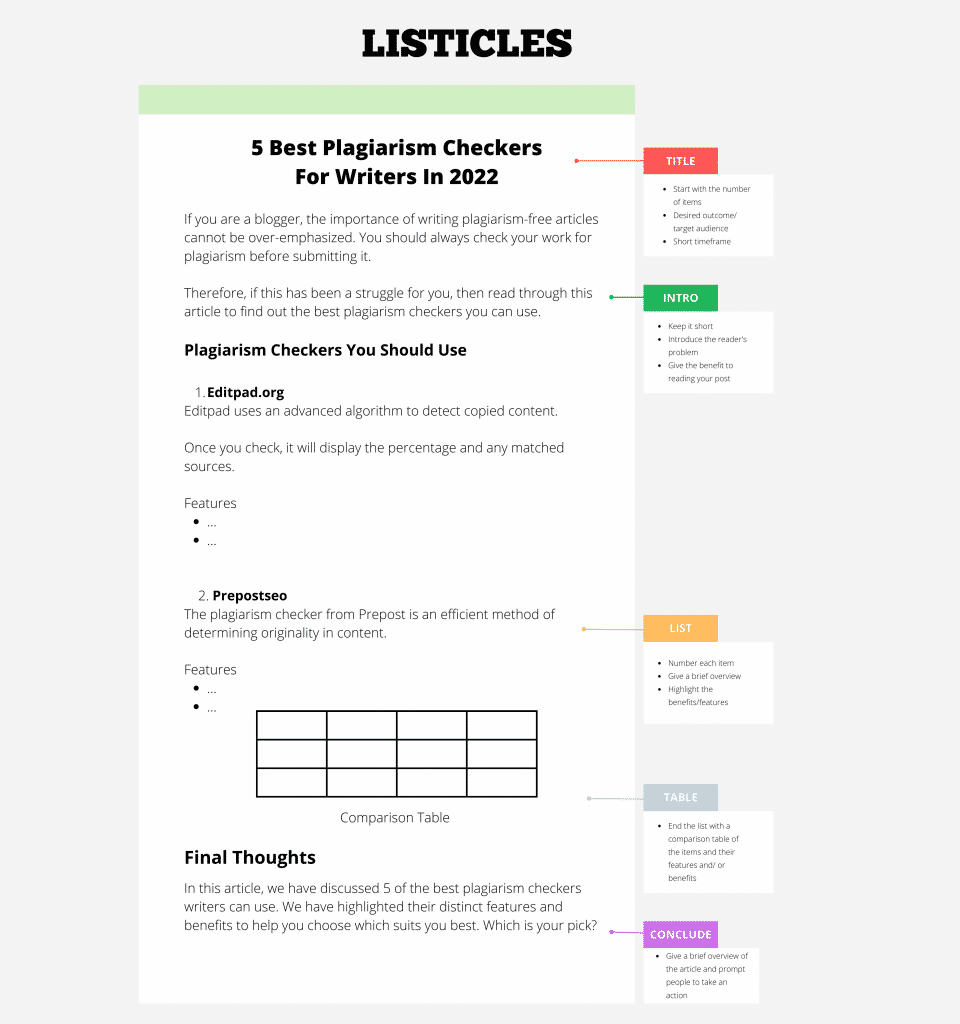
Listicle/ List Posts
A listicle is a blog post or article formed like a list. Usually, each point on the list is supported by images and relevant content. They are essential because they are easy to read and understand quickly, engaging and addicting to read. Moreover, they are easy to share and promote. Listicles are best for anything that doesn’t need to be in a specific order. For example,
- 12 wedding cake ideas
- 50 Christmas present ideas
- 23 hacks for maintaining a clean home
The blog post template in this section contains the title, content points, list items, images, and subheading, as shown below.
Implementing listicle blog post template
Here’s how to implement listicle blog post templates.
Do keyword research and pick the right topic
A good listicle title is attention-grabbing and accurately reflects the whole article. The title is essential because it tells you how long the list is and why you’d want to read it, and it targets relevant and high-volume keywords. Keyword research is critical in creating a listicle because when you optimize your content, it is more likely to rank highly in search engines. You can use free tools to do keyword research such as Google Keyword planner and look for long-tail keywords as listicles are perfect for targeting these valuable items.
Outline your content points
After choosing the topic and target keyword, you should focus on the content points. First, check out your competition and look for gaps in their content. Next, brainstorm and write down any relevant topics for your listicle and organize them. Moreover, you can research the ‘people also ask’ area to know the questions people commonly search about on the topic. Finally, as you write the content, link to more in-depth information when necessary as it creates more informative content without making your article too long.
Number the list items
It’s not essential to use numbers to create a listicle, but it improves the user experience. Moreover, using a numbered list creates a sense of progress when readers go through the article, and there’s also a feeling of accomplishment, which motivates them to keep reading. It also makes sense to number the items if you use a number in the post title. Numbering the list can enable the reader to keep track of their progress even when they stop to read later.
Numbering is also essential when someone wants to share or reference specific points, as it is easier to refer to a particular number. A round number like 8 is easy to remember, but odd numbers like 7 are unique and tend to pique the reader’s interest. It, however, does not matter as it depends on the topic and your competition. However, if others list 10 points, making 25 points is advisable.
Adding images
Images make your content visually appealing hence it is essential in a listicle. They improve the readability of the post and increase traffic. Moreover, they capture readers’ attention quickly. Ensure the images are relevant to the post. Custom photos are ideal when choosing images for your listicle. However, if you lack custom photos, you can find free photos online on Pixabay, Unsplash, and Flickr. If your list is shorter than 10, try including images for every listed item. You can add a photo every 4-5 paragraphs for longer lists to break the copy.
Use of subheading
They are essential because they separate each list item. Additionally, subheadings should be descriptive and benefit-focused. You can use (h2) to create a subheader for each item in your list. Moreover, ensure the subheading represents each point you’re listing. They can be numbers, but it is not essential.
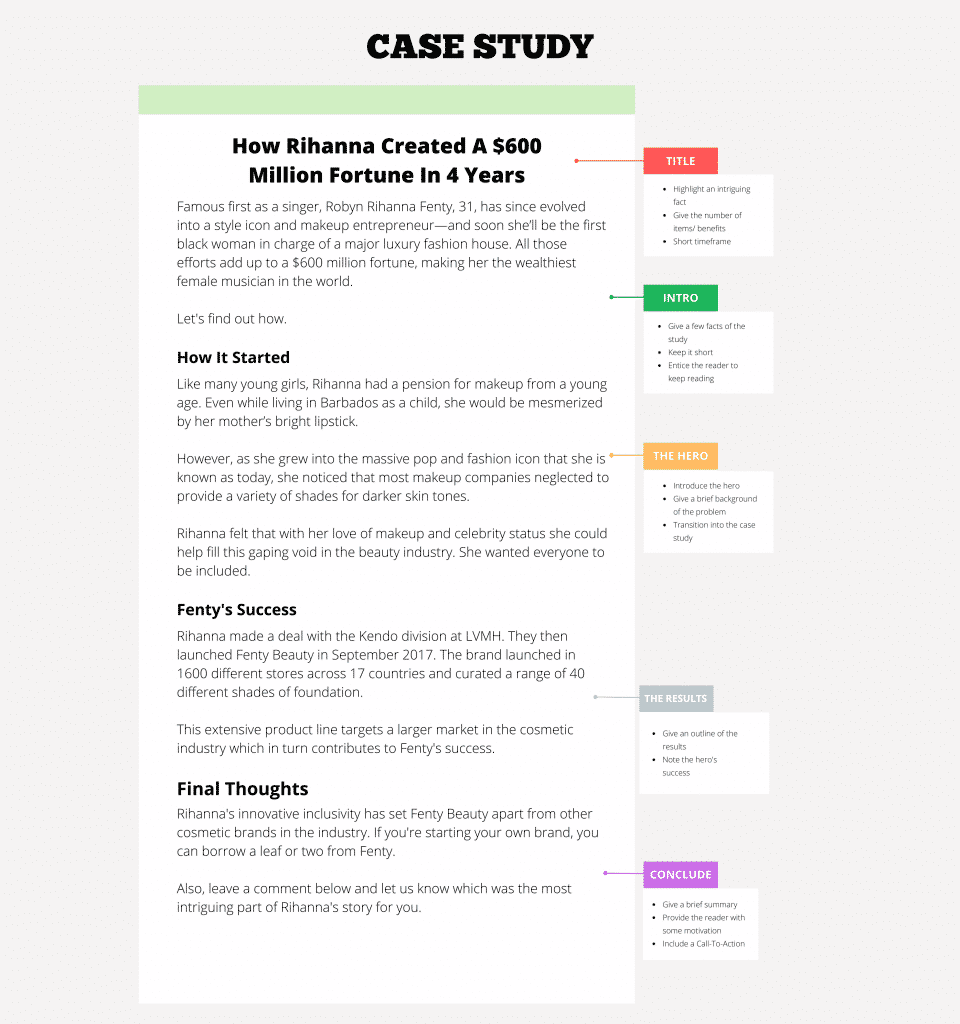
Case studies
A case study is a classic how-to post backed up with a real example. It should be backed up with data and include a comprehensive analysis. This blog post template is helpful for businesses in their early stages that need a way to prove the value of their product or service to attract more customers. Examples include,
- How I Increased my search traffic by 110% in 14 Days
- How a busy mom lost 9 pounds of fat in 30 days
- How I gained 35 lbs. Of Muscle in 4 Weeks.
Implementing this blog post template
Let’s look at what you need to write using this blog post template.
The Title
A good case study title has three elements. The specific benefit states the benefits that the ‘hero’ of your case study saw. Next is the number, which adds credibility to your case study by showing you have actual data behind your content. Finally is the Timeframe which specifies how long it took to see those benefits. Usually, the shorter the time frame, the better.
The Introduction
First, start your introduction with precisely what you will show them in the case study. Next, break down some content that makes you or your client relatable. Finally, preview the solution or system used to get this benefit. Then mention how you’ll outline how they did in detail.
The Hero Section
This is where you introduce the hero of your case study. It is essential because readers can connect with the said hero.
The Results Section
This section should dwell on your hero’s results. For example, you can outline what your hero achieved. This outline helps the reader understand that the narration is over and should focus on the content.
The Steps Section
Many case studies give brief details, but this should not be the case. The detailed steps make your case stand out. No fact is too small so ensure you fully explain them to the reader. You can even add images like diagrams and pictures to a visual presentation.
The Conclusion
You can start with a quick summary followed by a motivational line to remind the reader that they can achieve the same result. You can also add a Call-To-Action, in conclusion, to encourage the reader to use your product or service or to share them with others.
Step-by-Step Guides
A step-by-step guide runs through chronological steps to achieve an end goal. They are best for teaching readers how to do something in a specific order. Examples in this blog post template include,
- How to create SEO-friendly links in 9 steps
- How to get on the first page of Google (Interactive Guide)
- How to write a blog post in 5 steps
Implementing this blog post template
Let’s take a look at what you need to write using this template.
Planning the guide
Planning is a crucial step that you need to undertake. It will include the following;
Understand your target audience
It is crucial to understand your audience before writing a step-by-step guide. Do your best to regard who might read your guide and why. Moreover, consider their age, background, level of knowledge on the subject, and other factors to determine the crucial aspects of your guide. Understanding the audience is essential because it may influence the guide’s language, the number and complexity of the steps, and the necessary information to complete the process.
Carry out your research
You may do this by reading other step-by-step guides, watching instructional videos, practicing the process yourself for reading literature about the subject. Moreover, having an advanced understanding of the process can help you include all the actual and accurate content needed to complete the guide. Even if you have existing knowledge on the topic, it may be helpful to do a little research to update your techniques.
Look for useful material
The materials include a list of supplies you’ll need to complete the step-by-step guide. These valuable materials should be formatted as bullet points to be readable and scannable.
Writing the guide
After planning, you’ll dive straight into writing. Below are some best practices you should adhere to;
Creating a title
For these blog posts, the best titles are straightforward. Most step-by-step guides have roughly the same format. For example: how to (achieve the desired outcome). You can also add a text to spice things up, for example, how to (achieve something)(in xx steps).
Writing an introduction
Your main goal in the introduction is to establish that you understand the problem you’re trying to solve and propose a solution. You’re only giving a broad overview in the introduction; then, you’ll go into detail throughout the post. Moreover, if you have evidence that your process works, you can include it here.
Steps for your subheadings
You’ll want to create separate headings to break the process into actionable steps. Moreover, the previous step must connect to the next one and remind your reader not to skip through. Use H2s to break each point into a subheading. Then explain part of the process in more detail under each subheading.
The conclusion
There are a few options when concluding the step-by-step guide. For instance, you could suggest a few next steps for your reader. You could also end with a quick summary of the steps in the blog post. If you have a relevant product or service, consider mentioning it to the reader as your call to action.


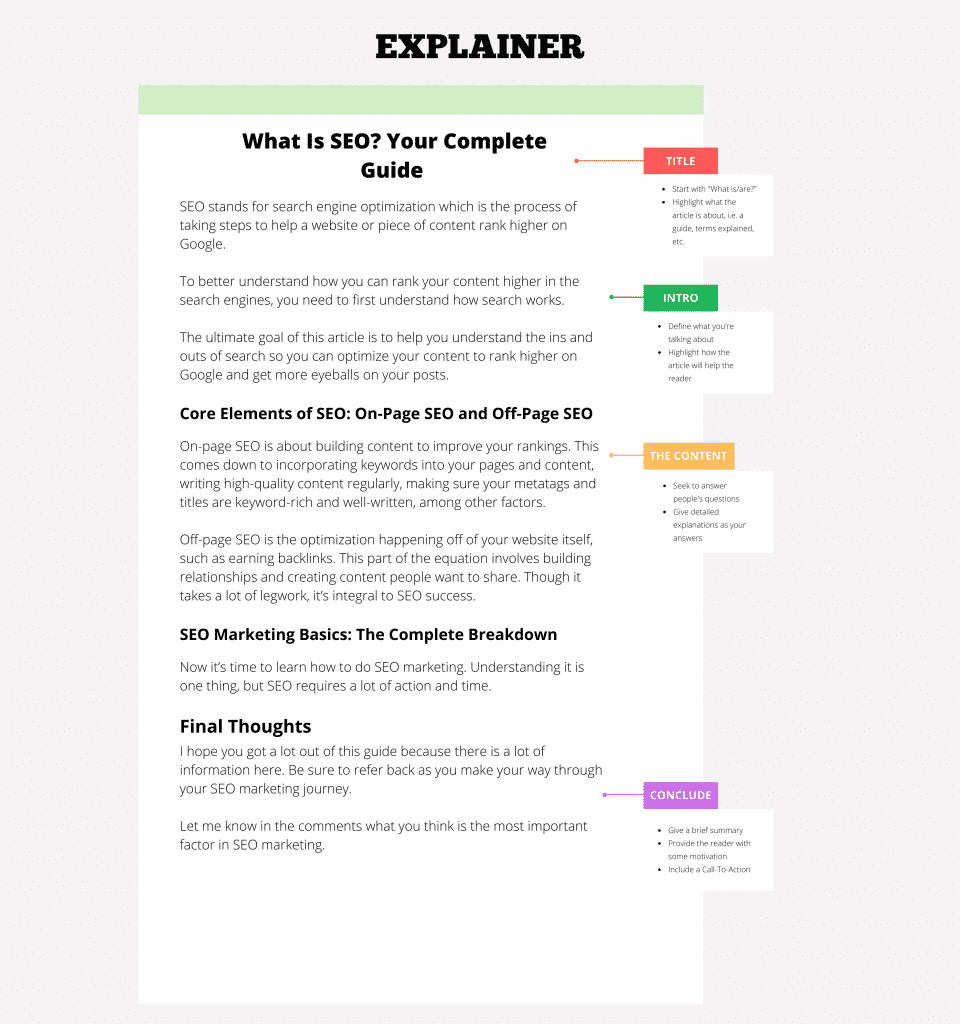
Explainer / Expanded Definition Blog posts
This blog post template provides readers with much-needed context to follow the workings of a specific subject. They explain the meaning of a thing or concept before going into more detail. If readers will find it hard to follow the ins and outs of your post without first understanding a concept, then this is probably the best format. For example, your target audience needs to understand the definition of a blog before learning how to create a blog. This blog post template will help you cover all aspects of your topic and give readers a deeper understanding of whatever you set before them. Examples include,
- What is SEO? Search Engine Optimization Explained
- What is a Backlink? How to Get more backlinks
- What is HTTP? Everything you need to know.
Implementing this blog post template
Let’s look at what you need to write using this template.
The Title
It should begin with what or what are. You can also add context and make your title more creative. For instance, what is (concept)? Everything you need to know.
Defining The Thing or Concept
Define the term right away without beating around the bush. People read your article because they’re eager to learn about the concept. Try to include the concept words in the featured snippet. However, don’t force these if it feels unnatural. Doing this may help your blog post rank higher in the search engines.
Follow Up Questions
Definitions should not take over the whole blog post. After that, you should answer the follow-up questions that readers might have after learning the meaning. Some of these questions are primarily found in the People Also Ask box in Google. You can learn what other things people want to know about your concept and answer these questions under H2 subheadings. A free keyword generator can also find more questions people ask about the topic.
The Conclusion
Just do a quick summary of the essential learnings from the post link to further resources on the topic. Finally, you can encourage readers to use your product or service using a compelling call to action.
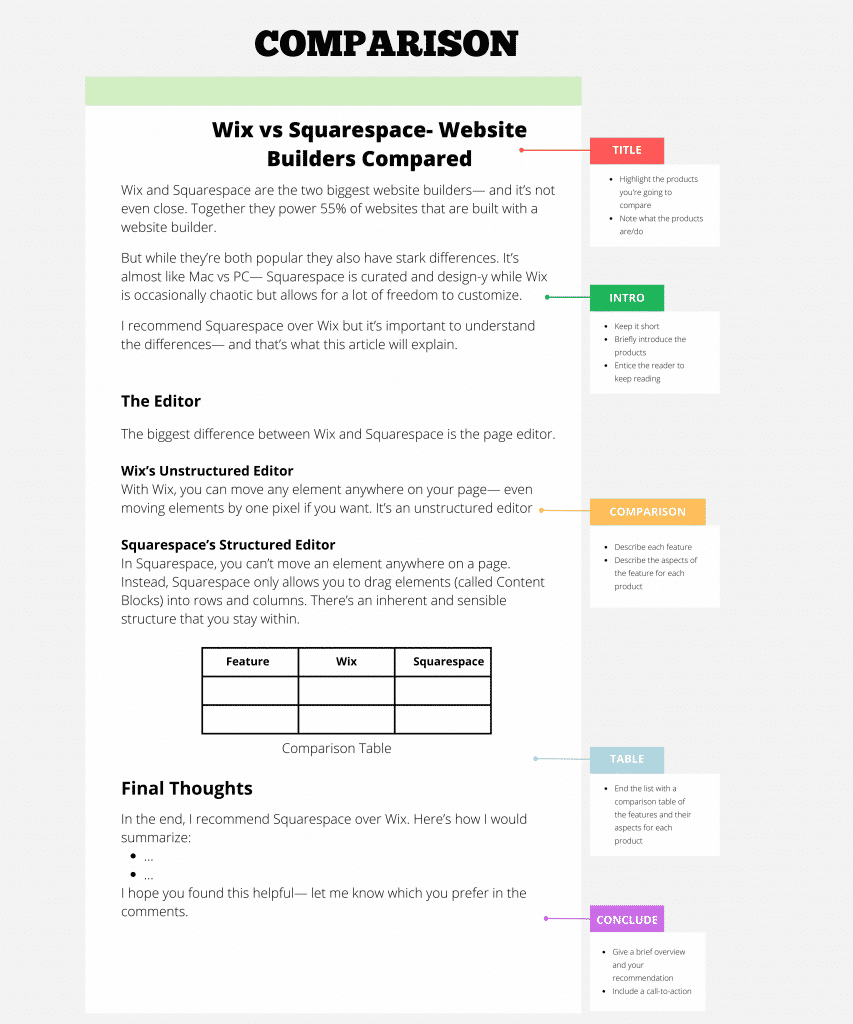
Comparison Posts; X vs. Y
Every reader has unique needs, and every business wants to meet them. Comparison blog posts are often used to help readers differentiate between products or ideas and finally help them settle on a decision. Therefore, they are suitable for targeting readers reaching the end of their buyer’s journey and are almost ready to make a purchase. By creating a side-by-side comparison, readers can better understand the advantages and disadvantages of a product or service. A good comparison article compares equivalent features, avoids bias, and makes solid observations that you can back up with evidence. Examples of blog post templates in this section include:
- Uber vs. Lyft
- HubSpot vs. MailChimp
- Renting vs. Buying
Implementing this blog post template
Let’s look at what you need to write using this blog post template.
The Title
Start with keyword research to know what people are looking for and get targeted keywords for your post.
Introduction
Think about the specific reader you’re targeting. If they’re looking to compare two products, they have basic knowledge about the topic. Therefore, there is no need to waste your time defining basic terms or providing background information they already know. Instead, focus on establishing what you’re comparing why and other essential details impacting your analysis.
The Overview section
This section gives more details about each of the two options. You can also describe how similar they are to one another. Introduce products X and Y briefly without comparison, separately.
Feature-by-feature Comparison Section
In this section, you can compare the products side by side or tackle each product in turn. For instance, you may have areas such as overview, price, and features and give a score of each product in each section.
You can also include specific data or statistics when comparing the two to make your post more objective.
The Conclusion
The conclusion of this blog post template generally involves which subject reigns superior or how the reader can make that choice for themselves. You can also quickly sum up each choice’s significant advantages and disadvantages to help guide the reader to a good decision.
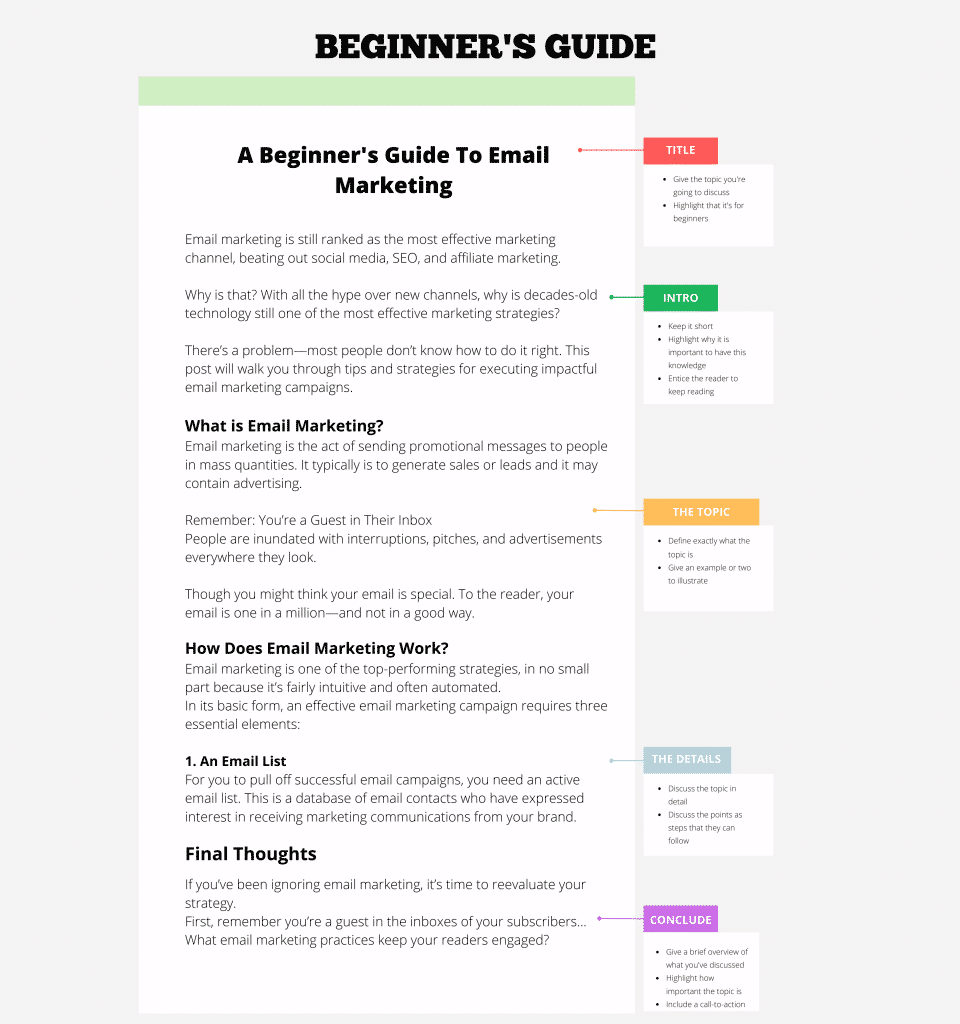
Beginner’s Guides
A beginner’s guide is an educational resource that offers a detailed introduction to a topic. Your beginner’s guide must provide a complete overview of a given topic. When writing, you need to be transparent in your definitions and explanations. Moreover, give your audience plenty of background information and relatable examples to back your claims. Also, enforce the blog post by using rich illustrations and simple language, avoiding jargon in the topic. If you plan to write more of an educational resource for beginners, this blog post template is the best choice. Moreover, Beginner’s Guides are usually valuable because they attract backlinks and social media shares. Examples of this blog post template in this area include,
- Duplicate content: The complete guide for beginners
- The Beginner-Friendly guide to link building
- Sewing: The Easy Guide for Beginners.
Implementing this blog post template
Here’s how to implement beginner guides.
The Title
It should contain the topic you’re covering and the words ‘Beginner’s Guide’. For example, The Beginner’s Guide to Crocheting. It is essential to pick a specific title for your guide to attract targeted readers.
The Introduction
First, give your reader a promise statement of the benefit they’ll get from reading your guide. Next, show your reader that you understand how difficult this topic is to learn. Finally, preview the greatness that they’ll get from reading the article.
The Overview Section
This section explains what the content you’re writing is about. Use exact words as it is a beginner’s guide, after all. First, you can start by giving a simple definition of the topic.
The Steps Section
Here’s where you walk your readers through the first crucial steps to guide them on their way. These ways will nudge them in the direction and not necessarily all the way. Also, think about a beginner’s questions about the topic and try answering them. Use the H2 subheading for each question.
The Conclusion
The conclusion should remind the reader how helpful your guide is. You can end with some final encouragement and links to further reading. Moreover, you can add a CTA to get readers to use your product or service.
Conclusion
Writing high-quality blog posts that people will love reading is a challenging task that requires planning and strategizing. This is why a blog post template is not such a bad idea. First, you need to identify the message you want to send and try searching for your target keywords to get some ideas. Then come up with a creative title to pique readers’ interests. Each of these templates works best for a particular type of content. Therefore, choose one that is suitable for you.
Content creation doesn’t have to be a headache. Use our free blog post templates to hone your writing process and create more compelling content.
1. Plan your blog post by choosing a topic, creating an outline, and conducting research.
2. Craft a memorable headline
3. Write the content of the blog post
4. Use images to enhance the post, improve its flow, add humor and explain complex topics.
5. Edit your blog post
It is a comprehensive guide to different posts. It helps you brainstorm, focus on planning and research, and write good content quicker and easier.
No, they don’t because blog posts broadly vary in format and style based on the publication. They, however, offer many other templates like essays and resumes.